Adding Custom Attributes in Active Directory User Properties
This is a step-by-step guide on how to create custom Active Directory attributes where an existing attribute is not available. For example, creating an attribute to hold the value of “Technical Department”. This guide is utilizing Microsoft Windows 2008 R2.
Guidance on adding custom Active Directory attributes
1. First ensure that the Schema Updates are enabled in the registry by configuring the following value:
HKEY_LOCAL_MACHINE\SYSTEM\CurrentControlSet\Services\NTDS\Parameters
Value Name: Schema Update Allowed
Type: REG_DWORD
Value: 1

2. Install the Schema snap-in by running a command prompt and entering: regsvr32 schmmgmt.dll
3. Now we need an Active Directory Schema console.
- Navigate to Start, Run, type MMC.
- From the File menu, select Add/Remove Snap-in…
- Select Active Directory Schema, click Add and OK.

4. Expand Active Directory Schema, right-click Attributes and click on “Create Attribute..”.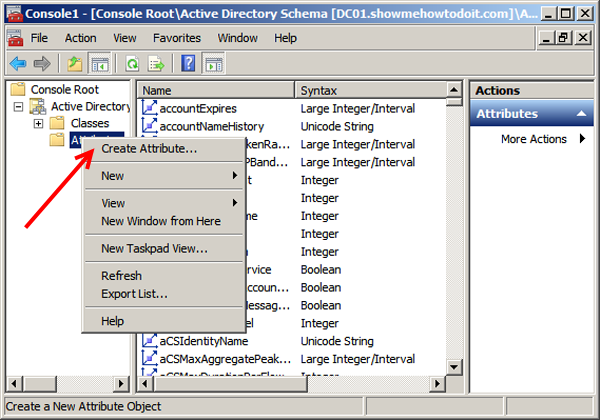
5. In order to proceed with the next step, you will need to generate an Object Identifier (OID) for the Unique X500 Object ID.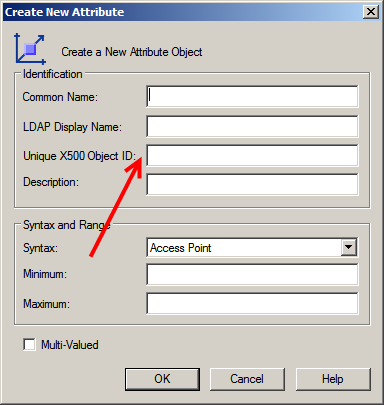
This is based on your domain. Use the following script (click here) to generate this. Simply save the code in notepad with file extension .vbs and execute it. The script will output something like:
Do not use the value above as each domain will have a different value. In this example, the value to be utilized will be the value stated above + some other suffix such as .2.1. The number 2 stands for the class and 1 for the attribute. So if we needed to add a second attribute, our suffix would be .2.2. It would be a best practice to have this information properly documented and controlled. So for our specific example, we would use 1.2.840.113556.1.8000.2554.22299.3130.65293.18626.46045.14916527.3721449.2.1
6. Populate the desired values.
- Common Name: Technical Department
- LDAP Display Name: technicalDepartment (This auto-populates but you can change it if you wish)
- Unique X500 Object ID: 1.2.840.113556.1.8000.2554.22299.3130.65293.18626.46045.14916527.3721449.2.1
- Syntax: Unicode String (this could be of a different type and depends on the usage of each attribute)

And click OK.
7. We will now add the attribute to the Person class. Navigate to the Classes leaf and select the Person class.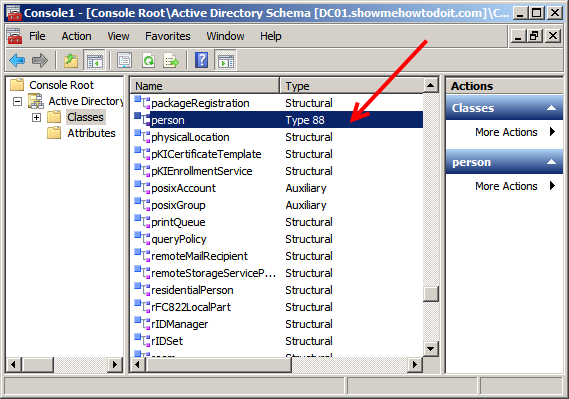
8. Right-click person, select properties, click on properties and navigate to the Attributes tab. Click on Add.
9. Locate the technicalDepartment attribute and click OK, and again OK.
10. Just to confirm that the attribute has been associated with person, right-click person, properties and navigate to the attributes tab. The technicalDepartment attribute should be present in the list of Optional attributes.
This completes the creation of a custom attribute. Note: When you close the console, the console may crash and usually this occurs when you do not save it. If you re-open the console the above change should be present.