How to delete XD Storage and Personal vDisk using PowerShell
Ever wonder how to delete a defined Virtual machine storage and Personal vDisk storage in Desktop Studio? This article describes a way to delete defined storage for both virtual machines and Personal vDisks. (The Hypervisor used in this example was VMWARE vSphere 4.x).
Instructions on deleting storage with PowerShell
1. In our example, we would like to remove the following storages:
- Virtual machine storage: XENDESKTOP01
- Personal vDisk storage: XENDESKTOP01
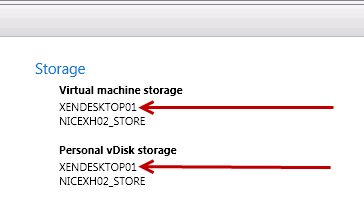
You can view defined storages by navigating within Citrix Desktop Studio, Configuration, Hosts and clicking on the specific host.
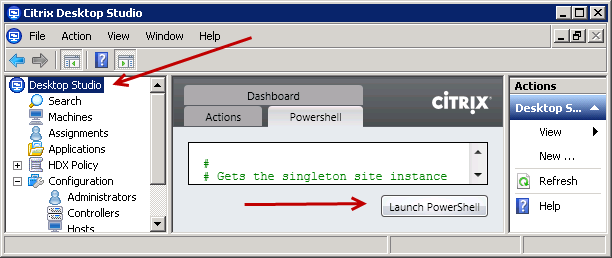
2. Launch PowerShell. The easiest way would be to launch it from within the Citrix Desktop Studio as it loads the necessary Citrix PowerShell snapins.
3. Execute the following commands to retrieve the storage information.
PS> cd XDHyp:
PS> cd HostingUnits
PS> ls

4. The output will look something like this, but values will be different for each environment.
PSPath : Citrix.Host.Admin.V1\Citrix.Hypervisor::XDHyp:\HostingUnits\vctr01
PSParentPath : Citrix.Host.Admin.V1\Citrix.Hypervisor::XDHyp:\HostingUnits
PSChildName : vctr01
PSDrive : XDHyp
PSProvider : Citrix.Host.Admin.V1\Citrix.Hypervisor
PSIsContainer : True
HostingUnitUid : edbe6226-5b83-41ed-8d37-252c8144e613
HostingUnitName : vctr01
HypervisorConnection : vSphere5
RootPath : XDHyp:\Connections\vSphere5\NEWYORK.datacenter\NEWYORK_CLUSTER.cluster
RootId : domain-c44
NetworkPath : XDHyp:\Connections\vSphere5\NEWYORK.datacenter\NEWYORK
_CLUSTER.cluster\vNetwork_10_5_5_A.network
NetworkId : Network:network-43
Storage : {XDHyp:\Connections\vSphere5\NEWYORK.datacenter\NEWYORK_CLUSTER.cluster\ XENDESKTOP01.storage, XDHyp:\Connections\vSphere5\NEWYORK.datacenter\NEWYORK_CLUSTER.cluster\ NY02_STORE.storage}
PersonalvDiskStorage : {XDHyp:\Connections\vSphere5\NEWYORK.datacenter\NEWYORK_CLUSTER.cluster\ XENDESKTOP01.storage, XDHyp:\Connections\vSphere5\NEWYORK.datacenter\NEWYORK_CLUSTER.cluster\ NY02_STORE.storage}
VMTaggingEnabled : True
UseLocalStorageCaching : False
Metadata : {}
For our needs we need the the information for HostingUnitName and Storage (the specific storage from the ones with the brackets).
In our case the values are:
vctr01
XDHyp:\Connections\vSphere5\NEWYORK.datacenter\NEWYORK**_CLUSTER.cluster\** XENDESKTOP01.storage
5. We will then need to execute the following command:
Remove-HypHostingUnitStorage –LiteralPath ### –StoragePath ###
Remove-HypHostingUnitStorage –LiteralPath ### –StoragePath ### -StorageType PersonalvDiskStorage
See http://support.citrix.com/static/kc/CTX127254/help/Remove-HypHostingUnitStorage.html for command reference.
In our example, we will need to execute the following commands:
Remove-HypHostingUnitStorage -LiteralPath ‘XDHyp:\HostingUnits\vctr01’ -StoragePath ‘XDHyp:\Connections\vSphere5\NEWYORK.datacenter\NEWYORK_CLUSTER.cluster\ XENDESKTOP01.storage’
and
Remove-HypHostingUnitStorage -LiteralPath ‘XDHyp:\HostingUnits\vctr01’ -StoragePath ‘XDHyp:\Connections\vSphere5\NEWYORK.datacenter\NEWYORK_CLUSTER.cluster\ XENDESKTOP01.storage -StorageType PersonalvDiskStorage
The second command specifies the -StorageType parameter for removing the Personal vDisk Storage.
6. Navigate back to Desktop Studio and verify that the specific storage values are not present anymore or run the PS> ls command.