Citrix Linux VDA 1.4 CentOS 7.2 - Preparation
In this section we will prepare the CentOS machine in order to proceed and install the Citrix Linux VDA. This process involves configuring the machine Hostname, Time service NTP, Installing Java OpenJDK, PostgreSQL, Winbind for domain authentication and joining the CentOS machine to the Windows domain.
The root account is used for configuration, but this is not appropriate for production environments. See References section for assistance using sudo option.
Hostname Configuration
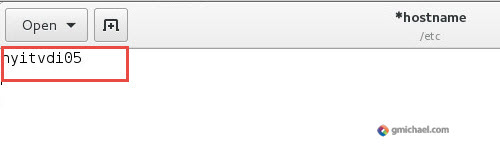
Change the /etc/hostname file to contain only the hostname of the machine.
Chance the /etc/hosts file.

In our example, we have used “nyitvdi05” and “showmehowtodoit.com” as the domain.
Verify hostname by running the following commands:
hostname hostname -f
Configure clock synchronization (NTP)
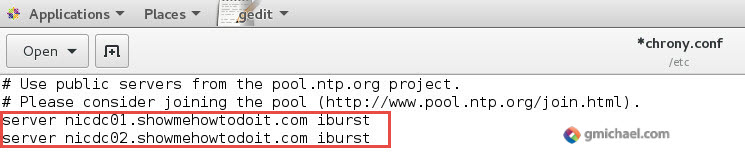
Edit /etc/chrony.conf and add a server entry for each domain controller.
This assumes that domain controllers are the official time sources, but you should add the appropriate time source for your environment.
sudo /sbin/service chronyd restart
Install Java OpenJDK
sudo yum info java-1.8.0-openjdk
export JAVA_HOME=/usr/lib/jvm/java
java –version
PostgreSQL
Execute the following commands to install postgresql
sudo yum -y install postgresql-server sudo yum -y install postgresql-jdbc
Initialize the PostgreSQL database.
sudo postgresql-setup initdb
Configure the service to start on boot, and start now.
sudo systemctl start postgresql sudo systemctl enable postgresql
Run the following command to check the version.
psql –version
You can verify the data directory with the following command.
sudo -u postgres psql -c ‘show data_directory’
Other Packages
Install Motif
sudo yum -y install motif
Install Printing Support
sudo yum –y install cups sudo yum -y install foomatic-filters
Install Other Packages
sudo yum -y install redhat-lsb-core sudo yum -y install ImageMagick
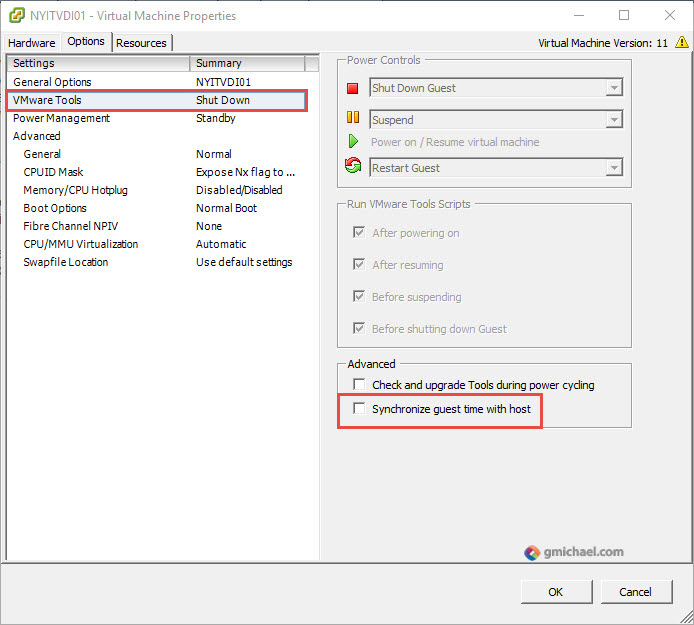
Time Synchronization on ESXi
Ensure that the VDI is not using the ESXi host for time sync.
Install Samba Winbind
Install Samba Winbind by running the following commands
sudo yum -y install samba-winbind \ samba-winbind-clients \ krb5-workstation \ authconfig \ oddjob-mkhomedir
Configure Windbind daemon to start on boot.
sudo /sbin/chkconfig winbind on
Below is a generic command on how to configure Winbind. You will need to be careful with this command and pay attention to use upper-case for the REALM.
sudo authconfig \ –disablecache \ –disablesssd \ –disablesssdauth \ –enablewinbind \ –enablewinbindauth \ –disablewinbindoffline \ –smbsecurity=ads \ –smbworkgroup=domain \ –smbrealm=REALM \ –krb5realm=REALM \ –krb5kdc=fqdn-of-domain-controller \ –winbindtemplateshell=/bin/bash \ –enablemkhomedir –updateall –enablekrb5kdcdns –enablekrb5realmdns
See a complete example below:
sudo authconfig \ –disablecache \ –enablewinbind \ –enablewinbindauth \ –smbsecurity=ads \ –smbworkgroup=SHOWME \ –smbrealm=SHOWMEHOWTODOIT.COM \ –winbindtemplatehomedir=/home/%D/%U \ –winbindtemplateshell=/bin/bash \ –enablekrb5 \ –krb5realm=SHOWMEHOWTODOIT.COM \ –krb5kdc=nicdc01.showmehowtodoit.com \ –krb5adminserver=nicdc01.showmehowtodoit.com \ –enablekrb5kdcdns \ –enablekrb5realmdns \ –enablelocauthorize \ –enablemkhomedir \ –enablepamaccess \ –updateall –enablekrb5kdcdns –enablekrb5realmdns
The above command will most likely generate an error since the machine has not joined the domain yet.
Edit /etc/samba/smb.conf and add the following lines under the [Global] section but after the #–authconfig–end-line–:
kerberos method = secrets and keytab winbind refresh tickets = true
Join computer to domain, ensure the value for REALM is replaced with the domain in upper-case, and replace “user” with an account that has access to join the computer to the domain.
sudo net ads join REALM -U user
Configure PAM for Winbind
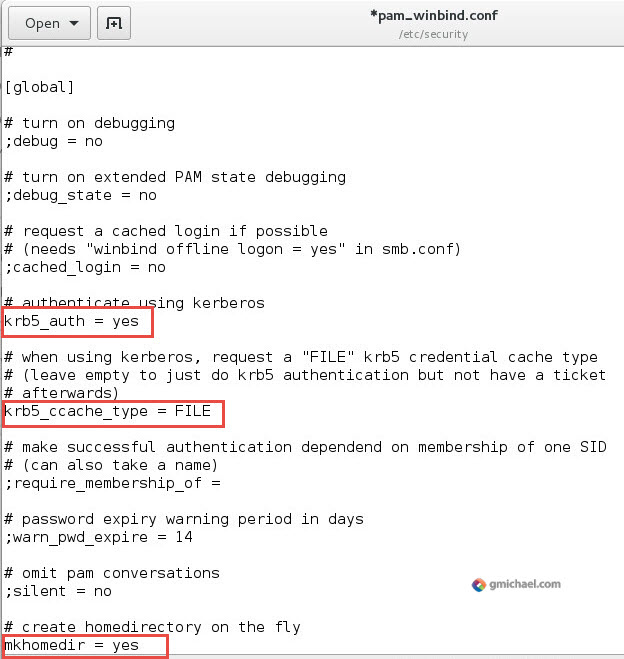
Edit /etc/security/pam_winbind.conf and change the following values:
krb5_auth = yes krb5_ccache_type = FILE mkhomedir = yes
Ensure to uncomment the values
Restart Winbind.
sudo /sbin/service winbind restart
Edit /etc/krb5.conf with the following value:
default_ccache_name = FILE:/tmp/krb5cc_%{uid}
Verify Domain Membership
sudo net ads testjoin sudo net ads info
Verify Kerberos Configuration
Ensure you replace MACHINE with the computer name and REALM with domain name, both in upper-case. Example:
sudo kinit -k NYITVDI05\$@SHOWMEHOWTODOIT.COM
sudo klist -ke sudo kinit -k MACHINE\$@REALM sudo klist sudo net ads status
Verify User Authentication
wbinfo –krb5auth=domain\\username%password